
Yield: 10 – 8 (large to small)
Prep time: 4 – 5 hours
Cook time: 30 minutes
Total time: 4 hours 30 minutes – 5 hours
Puran poli is traditionally a South Indian sweet flatbread stuffed with sweet lentil filling made from skinned split Bengal gram or chana dal and jaggery. An ideal flatbread to eat anytime, which you can now have without gluten and enjoy the same traditional taste and texture 😊 You can also make this dairy-free!
INGREDIENTS
Sweet stuffing
- 1 C powdered jaggery
- 1 C chana dal (skinned split Bengal gram lentil)
- 3 C water for pressure cooking the chana dal
- 2 tsp oil or ghee
- 1 tsp fennel powder (made from fennel seeds)
- ½ tsp – 1 tsp dry ginger powder (or freshly grated)
- ½ tsp cardamom powder (5 green cardamom pieces finely crushed)
- ¼ tsp nutmeg powder
Poli or the outer covering
- 2 C Metta GF flour
- ½ teaspoon of salt
- Slightly less than 1 C water at room temperature
- Oil or ghee for pan-frying the polis
- ¼ tsp turmeric powder (optional)
- ~1/4 C of Metta flour in a bowl for rolling the polis
Tools Needed
- Rolling pin
- Skillet (preferably hard anodized pan)
- Flat spatula
INSTRUCTIONS
- Puran stuffing: rinse chana dal well. No need to soak, but you can for an hour or two if you prefer.
- Cook the dal in the pressure cooker for up to 6-7 whistles or in the instant pot for 10 – 15 minutes. The dal should be fully cooked.
- While the dal is cooking, make the dough for the poli. In a bowl, stir together the flour, salt, and water (including other optional ingredients). Mix and knead well until the dough starts to pull away from the sides. (I knead the dough in an Kitchen Aid electric mixer for about 5 minutes using the hook attachment, so it is kneaded to perfection without tiring the arms.) The dough should not be sticky nor wet. It should be firm yet pliable. Place a moist paper towel over the dough and put it in a container with a cover to avoid developing dry skin on it. Keep the container aside.
- Once the dal is cooked, drain the water or keep the stock for another use like broth for soup or even using it for kneading dough for regular chapatis.
- Heat oil in a pan and add the ginger powder, nutmeg, cardamom powder and ground fennel powder. Fry them on low heat for a few seconds.
- Next, add the chana dal and jaggery. Cook the mixture on low heat, stirring in between, until it becomes dry and thick. Remove from the flame and let it cool.
- Once cooled, mash it well using a masher or a mixer. You can make a 1 -2 inch balls out of the mixture or leave it as a mixture to stuff the poli. Leave aside.
- Preheat skillet, or tawa, to medium-high heat.
- Smear a little dry flour on your hands before making the dough balls for the poli to prevent the dough from sticking to your hands. Divide the dough into 8 – 10 balls.
- When ready to roll, dip each dough ball in its entirety into dry flour to avoid sticking to the rolling pin. Place it on a clean countertop to roll using a rolling pin.
- Roll evenly applying gentle pressure into a round ~4 – 5” in diameter (if it starts breaking or sticking to the counter or rolling pin, you may be pressing too hard).
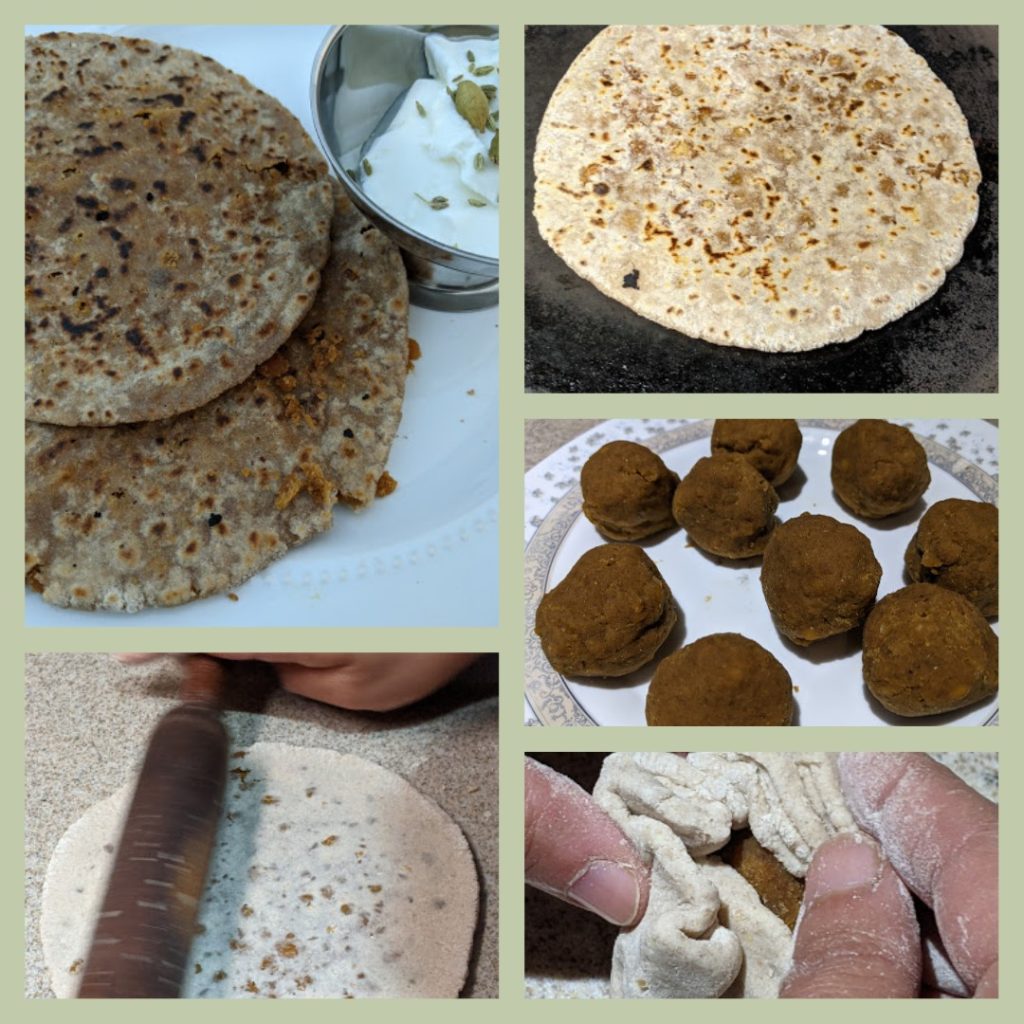
- Place a portion of the puran mixture or the already prepared puran ball in the center of the rolled dough.
- Next, bring the edges together towards the center and join all the edges and pinch them.
- Sprinkle additional dry flour and smear it well all over or dip the poli filled dough disc into some dry flour and roll the dough to a size you prefer.
- Place the rolled poli on the heated skillet. Cook the side for about a minute until it gets brown, turn over and smear a little oil on the browned side. Then, turn over again after a minute and oil other side. Cook both sides well until you see brown spots and golden.
- Make the rest in the same way stacking them in a casserole dish or a tortilla warmer.
- They are ready to eat and enjoy them warm or later. Recommend eating them with butter or yogurt.
Other Tips: When making a bunch of them at once, it is best to stack them in a foil, a tortilla warmer or in another container wrapped in a cloth. This will keep them warm and soft for hours.
If any left over, save them in a foil or zip lock bag over night on the counter and eat them the next day after warming in a zip lock bag or in a tortilla warmer for 25-30 seconds in the microwave. You can also store them in the refrigerator in a tightly sealed bag and consume within 2-3 days. They may harden in the refrigerator, because they are made without any preservatives, but warming them in the microwave or on a hot (at least 500 F) skillet will make them soft again. They can be frozen once cooled.
Have you used Metta gluten-free flour for this recipe or any other recipe?
Kindly take a moment to leave a review here to help our community!
Any questions or concerns or ideas on how to improve our recipe and/or process, please feel free to contact us at mettagfatta@gmail.com